Hot Guide & Tips
Software Testing
Please download Test resources to test & compare Moyea SWF To Video Converters with other SWF converters!
1. Music flash controlled by script:
Download Beautiful.swf
2. Interactive game flash:
Download GangsterPursuit.swf
Download CrusaderTrank.swf
More test resources and info...
How to create Flash SIMPLE BUTTONS?
The easiest way to create buttons with Flash is creating a Button object.
First look at this example of a simple Button object:
![]()
CREATING A BUTTON
To create a Button object, do this:
1, Choose Insert->New Symbol in the menu (Or press Ctrl-F8)
and the Symbol Properties Box appears.
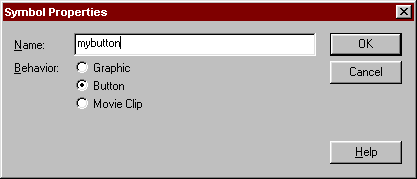
Add a name for your button and make sure the Button option is selected.
2: Click OK and the button editor opens.
As you see it looks exactly the same as the standard Flash editor, with one exception:
You only have four frames in the timeline.
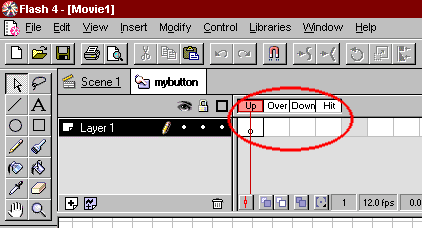
3: Draw a button the way you want it to be when no mouse event is detected.
Notice that the active frame is labelled "Up" in the timeline.
4: Insert a keyframe in the frame labelled "Over" in the timeline.
(To do this: Click on Layer 1 in the white cell below where it says "Over". Then press F6.)
5: Draw a button the way you want it to be when a mouseover event is detected.
6: Insert a keyframe in the frame labelled "Down" in the timeline.
(To do this: Click on Layer 1 in the white cell below where it says "Down". Then press F6.)
7: Draw a button the way you want it to be when a mouseclick event is detected.
That's it - you've created a button with three looks that will change upon mouse events.
You still need to specify which area should be clickable as well as what should happen when the button is clicked.
Proceed to learn about these steps.
![]()
DEFINING THE CLICKABLE AREA
The last frame, labelled "Hit" is special. It is simply used to specify the area that triggers mousevents.
If you leave this frame blank - then mouse events will be triggered when the mouse moves over the visible button.
But if you draw an area that is bigger than the button - then the mouse event will occur as soon as the mouse gets even close to the button. On the contrary you can draw an area that is smaller than the button, so that mouse events are only triggered when the mouse is at the center of your button.
However, the real power of the "Hit" frame is a bit more sophisticated.
If you draw something in the hit area that is outside the area covered by the visible button - then the button will react to mouseevents in the Hit area. That means that you can make something happen on one part of the screen when the user moves the mouse over another part of the screen.
Look at this example:
![]()
ADDING ACTIONS TO THE BUTTON
The button we created so far is still in the Button object editor. We still haven't dragged it onto our main movie.
If you look above the timeline you see two Icons labelled "Scene 1" and "mybutton".
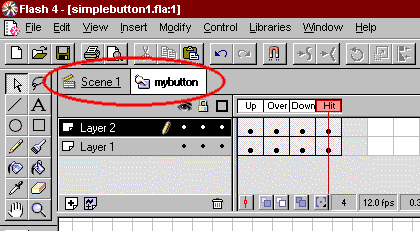
1: Click the "Scene 1"-icon to return to the main movie.
2: Click on the button in the Library window and drag it onto the movie.
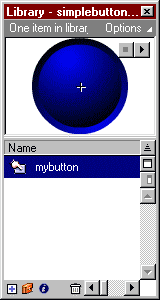
If your Library is not visible choose Window->Library (or press Ctrl-L) to make it visible.
3: Once the button have been placed correct in your movie right click on it and choose "Properties" in the menu that appears.
An Instance menu appears.
4: Select "Actions"
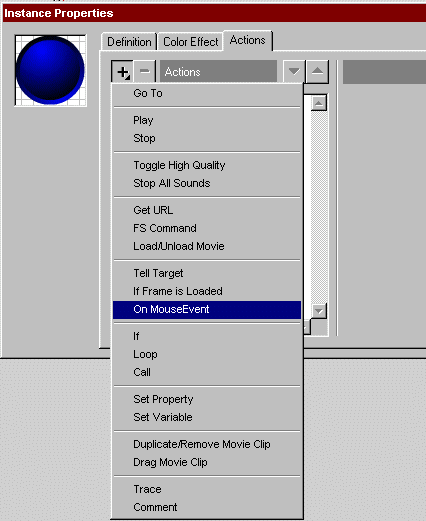
5: Click the plus Icon and select the "OnMouseEvent" option.
6: Select "Release" in the list of event triggers.
The action now says:
On (Release)
End On
This means that we have told Flash that it should react on a mouse-click release event.
But we still haven't told what should happen when the event is detected.
We have several options available. The most important ones are listed below:
![]()
Jump to another Frame
Click the plus once more and select the "Go To" option.
Now, the action says:
On (Release)
Go to and Stop (1)
End On
Eventually use the options to specify the frame you want to jump.
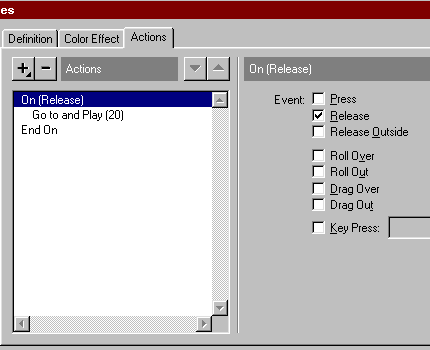
If you don't want the movie to stop, once the jump has been made, you should select the Go to and Play option at the bottom.
If, say, you entered frame 20 and selected the Go to and Play option, the action would be:
On (Release)
Go to and Play (20)
End On
And the Instance menu would look like this:
Load another page
Instead of jumping to another frame you could make the button work as a normal hyperlink.
Click the plus and select the "Get URL" option.
Now the action says:
On (Release)
Get URL ("")
End On
If you enter https://new.swfkits.com in the URL field the action looks like this:
On (Release)
Get URL ("https://new.swfkits.com")
End On
CONTROLING WINDOWS TO LOAD URL
You can control which window the URL should be loaded into.
In the Window filed you have four options:
_self : Opens the URL in the current window. (Same as if you did not specify any window)
_blank : Opens the URL i na new window.
_parent : Opens the URL in the parent frame (only works with framesets).
_top : Opens the page in the current window - if it's a frameset all frames are cancelled.
This action would open echoecho.com in a new window:
On (Release)
Get URL ("https://swfkits.com", window="_blank")
End On
![]()
PASSING VARIABLES TO THE URL THAT IS LOADED
The last option, "Variables" allows you to pass variables from the flash movie to programs running on the server.
If you choose either "Send using GET" or "Send using POST" Flash will open the specified URL as if it was requested by a form-submission. We will not cover the subject further here, since it really belongs to the more advanced tutorial on Flash programming.
When you're familiar with the simple buttons explained on this page you are ready to proceed to the more advanced buttons that are based on Movie clips.
The following two pages will explain the powerfull techniques behind these buttons. Advanced button.