Product List
Software Testing
Please download Test resources to test & compare Moyea SWF To Video Converters with other SWF converters!
1. Music flash controlled by script:
Download Beautiful.swf
2. Interactive game flash:
Download GangsterPursuit.swf
Download CrusaderTrank.swf
More test resources and info...
Price: $49.95
![]()
![]()
How to Convert Flash to Microsoft Zune movies with SWF to Zune Converter
Want to upload the pop songs with flashes to your Zune? Want to listen music whiling watching the fantastic flashes? Want to watch your favorite flashes again and again? Want to watch it anytime, anywhere? If Yeah, come with me. Here I recommend you a magic converter tool, which enables us to convert the *swf file formats to video formats, whatever video formats you can get for your Zune. That's Moyea SWF to Zune Converter.
Download it from https://new.swfkits.com/swf_to_zune/ and install it on your computer.
1. Input the Flash Files
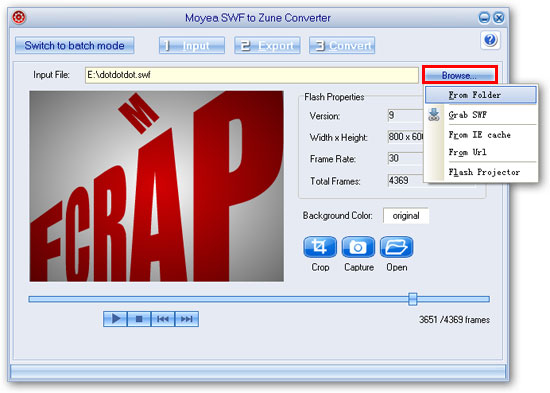
On opening the software, you will get the following window, which is for the single mode conversion. If you have only one file to convert, please go on with it. If many, you can click the "Switch to batch mode" tab on the top left to shift to the batch mode conversion.
Click "Browse" to input your flash files on your computer, and click "V" immediately behind to choose from "From Folder", "From IE Cache", and "Flash Projector", and there will be a dialog box pop up accompanying with each preference. In it, click the file name, and it will play automatically, then click "OK". On the left of the playing pane are the properties of the flash file. Click "Export" to set the export settings.
Tips: Click the "Original" in the box to set the background color. You can set the basic color or the DIY color as the background color.
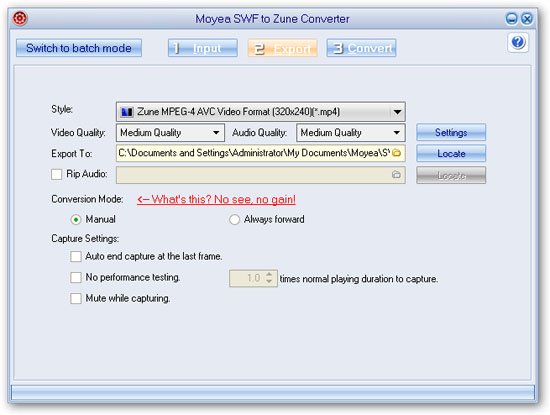
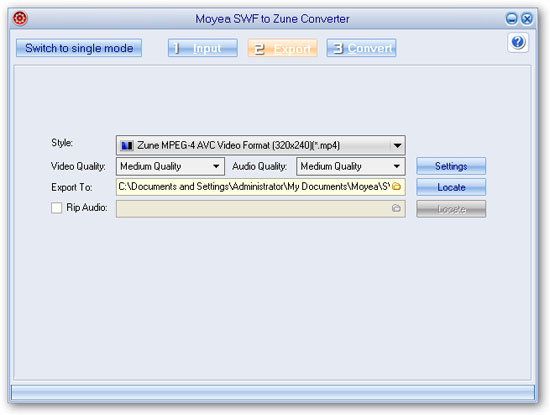
2. Export Settings
① Click "Style" to choose your output file format from the drop-down list.
② Click the "folder" in the "Export to" box to set the output destination, and click "Locate", the destination folder will pop up immediately.
③ Select the check box before the "Rip Audio", and the audio will be extracted and generated as a single file. Click the folder on the right to browse for the audio destination folder, and click "Locate", the destination folder will pop up itself.
④ Click "Convert" tab on the menu to convert.
3. Audio & Video Settings
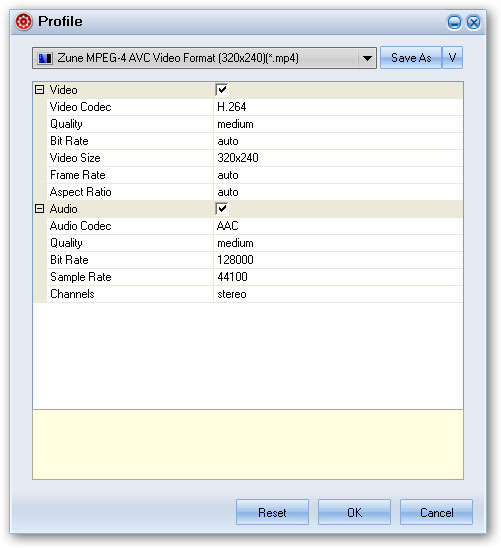
On choosing each item in the box under the "format", and the values in the "Settings" window on the right will change in accordance. Change the video and audio parameters by clicking "Settings" for each item and selecting the value. Click "Save As" immediately after the box to save the profile you set as a new one. Click "V", you can save, rename, or delete the newly set.
4. Convert
If you have chosen "Always forward" conversion, then the process which is the same with "Batch Mode" would automatically process. If you have chosen the "Manual Mode" conversion, then the program will auto test the performance of the flash SWF file to find the best capture and conversion speed for you. Then the program will play the file for you to set start and end points of the capture.
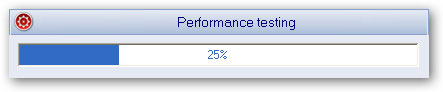
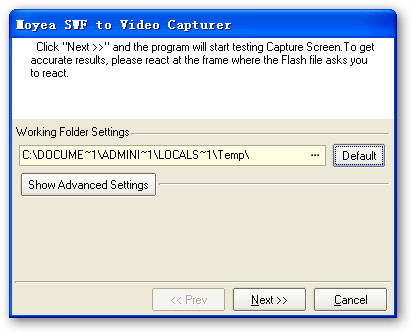
Of course, if you would like to re-test the performance, you can click the button "Option" in the capture step, choose "Performance testing", then a operation window will be pop-up.
Set the working folder or just keep the default. To guarantee an accurate result, you are suggested to interact with the flash when it asks you to.
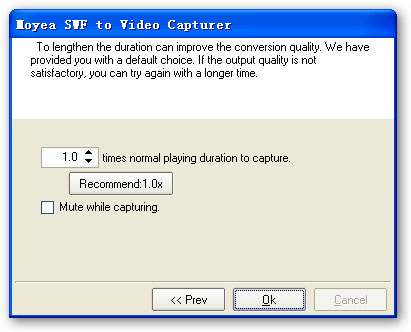
Click next, the program will auto test the performance of the flash SWF file. Later you will get a flash clip, which is the testing of the screen capturing speed. After a second, you will get the following window for you to set the screen capturing speed. Set the speed, or just keep the default. Click "Next" to continue. Check the "Mute while capture" box for silent capture.
Click "Ok" to complete the performance test. After completed the performance testing, you are allowed to play and capture the flash SWF file for conversion. Intuitively, the following interface will appear.
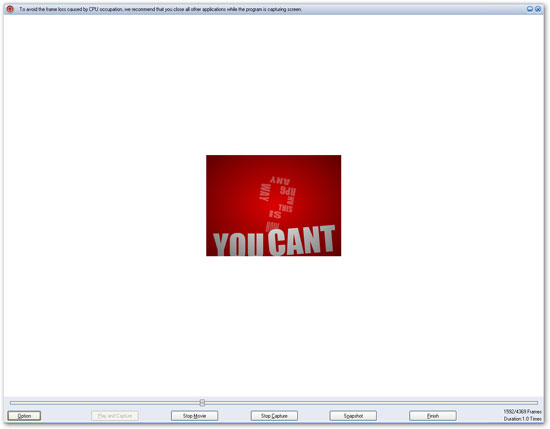
Option: Performance testing & Stopped frame.
Performance testing: If you have valued "No performance testing" in the "Export" interface and if you want to test the performance again, you can click this button and choose "Performance testing" to test the performance.
Stopped frame: you can click it to set the stopped frame to capture the flash to convert, but please note that the contents of the specified stop frame can not be captured to convert.
Play and Capture:Click it to start play and capture the contents for conversion simultaneously.
Play Movie: Click it to play the flash without capture. The button will auto change to "Stop Movie" after play movie valued, and then you can click "Stop Movie" button to stop playing the flash.
Start Capture:Click it to start capture the flash to convert if you like. The button will auto change to "Stop Capture" after start capture valued, and then you can click this button to stop capture the contents to convert.
Snapshot: Click it to capture any current frames of the playing flash file to save as JPEG, BMP and THM format. Just like the function of "Camera", but the captured picture would be bigger than the former mentioned.
Finish: Click it to finish capture flash for conversion or exit the capture window. If you did not start capture at all, click this button will exit the conversion, and there would be prompt; if you have started capture and clicked this button, the program will only can convert the captured contents to convert, the other contents would not be able to handled. Besides, the output file may not be able to play if the captured contents are too short. Another prompt would be also occurred.
Note 1: With this software in this interface, you can drag the process bar to play and continually capture any frames of Flash (SWF file) file.
Note 2: Lowering the capture speed can improve the conversion quality. We have provided you with a default choice. It is recommended that to use the auto-counted capture speed. If the output quality is not desirable with, you can try again with a lower speed.
Then, the encoding process starts, and after a while, the conversion will complete. Confirm the "Conversion Success" and the output folder will pop up automatically. Now the rest is to enjoy your fancy!
Well, this converter software can also convert files in the batch mode, and it is much easier.
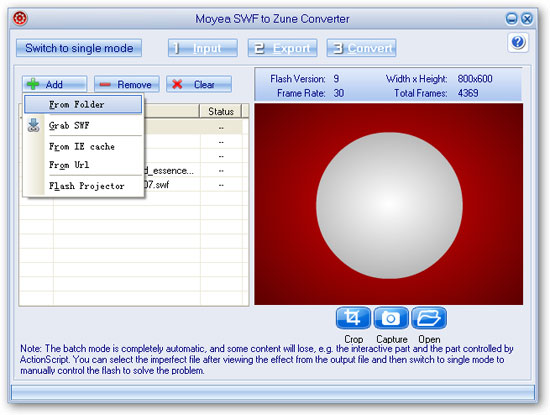
1. Input Flash Files
Click "Add" to add the files from your computer folder. Click "v" immediately after "Add", there will be a drop list cascade automatically. Choose from the "From Folder", "From IE cache", "From Projector" to input your flash files.
Click the file name to play it. On the right top of the playing pane are the properties of the current flash file. Click the "Export" tab in the menu to the export settings.
2. Export Settings
All are the same to the "Single Mode", except that you can not choose to convert in "Manual Mode" or "Always forward".
3. Conversion
On clicking the convert button, you will get some twinkle interfaces. One is the Performance testing for capturing speed, the second is the capturing of screen for program, and the last is the encoding window. That is the whole process of conversion. The conversion process is fast, however, it depends on the file size, the smaller the faster. As batch mode is automatic, you can totally be relaxed while waiting the conversion to be finished.
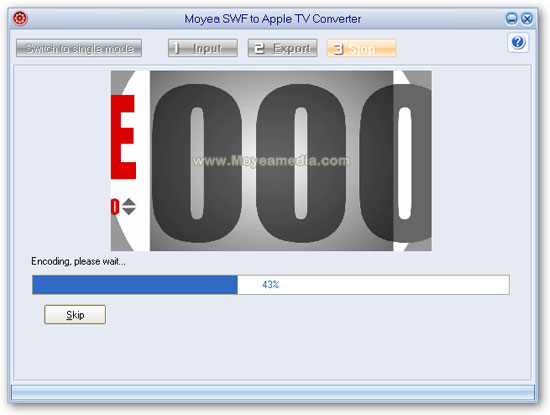
Then encoding process begins. When the conversion completes, it's time to enjoy the converted Zune compatible MP4 file on your Zune!
Price: $49.95
![]()
![]()
You May Also Be Interested in These Items
 Moyea SWF to Video Converter Std
 Total Flash SWF to Video Converter Solution for common users! Learn More...
Price: $69.95
![]()
![]()
 Moyea SWF to Video Converter Pro
The best & the only SWF Converter solution for professionals! Learn More...
Price: $99.95
![]()
![]()